Steps to Script File Encryption
In some real-world scenarios, script file accesses need to be strictly controlled through different privileges in order to ensure data security. Only privileged users are allowed to check the result data of executing certain script files, or scripts can only be executed on certain types of hardware.
To meet these needs and the like, both esProc Enterprise edition and Standard edition offer script file (.splx) encryption functionality. The functionality allows users to customize the encryption/decryption function by defining the privileges as needed, and executes encryption on the .splx file while recording the decryption function information in the encrypted file.
Here are the steps to encrypt a .splx file:
1. Define an encryption/decryption function
You can use an external static function to define an encryption/decryption function, where the input parameter type and the returned result type should be byte[ ]. For example:
package com;

public class Jm {

   public static byte[] encrypt(byte[] bytes) {
     … …    //Encryption
  }

   public static byte[] decrypt(byte[] bytes) {
    … …    //Decryption
  }
}
2. Deploy class file
Put the custom function’s class file to the path【esProc installation root directory】/esProc/classes.
3. Configure encryption information
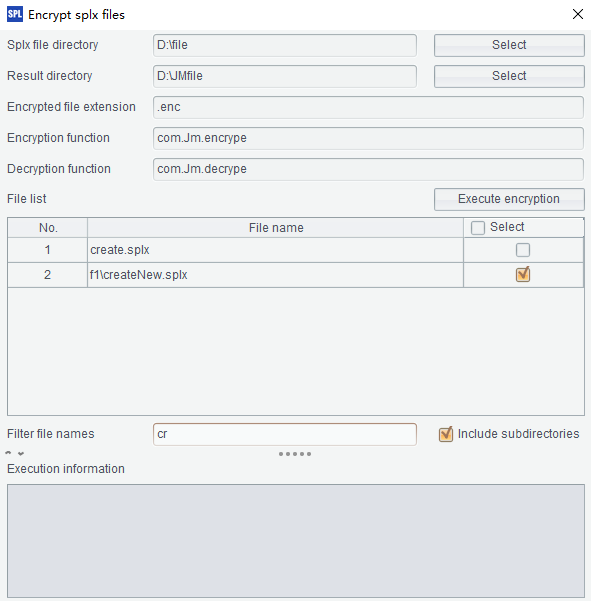
Open esProc IDE and click Tools - Encrypt splx file:

Configure Splx file directory, Result directory and Encrypted file extension.
In the above figure the to be encrypted splx file is located in D:\file and the would-be encrypted splx file is located in D:\JMfile. The encrypted file extension can be custom, but by default, it is .enc. The splx file D:\file\a.splx, for instance, will by default become D:\Jmfile\a.enc.splx after it is encrypted.
Select the to-be-encrypted splx file.
Configure the Encryption function and Decryption function. The function syntax is “complete class path. Method name”.
4. Execute encryption
Click【Execute encryption】” button to encrypt the splx file selected from the file list. The execution information will be displayed in the box under it:

When the encryption is finished, the newly generated encrypted script file will be saved in the specified Result directory.
The script encrytion/decryption class file deployed in section 1 and section 2 can also work in the scriptsave() function, besides being used in the IDE - Encrypt Script functionality.
SPL Official Website 👉 https://www.scudata.com
SPL Feedback and Help 👉 https://www.reddit.com/r/esProcSPL
SPL Learning Material 👉 https://c.scudata.com
SPL Source Code and Package 👉 https://github.com/SPLWare/esProc
Discord 👉 https://discord.gg/2bkGwqTj
Youtube 👉 https://www.youtube.com/@esProc_SPL


Chinese Version