

Basic Manual of Scudata SPL Cloud
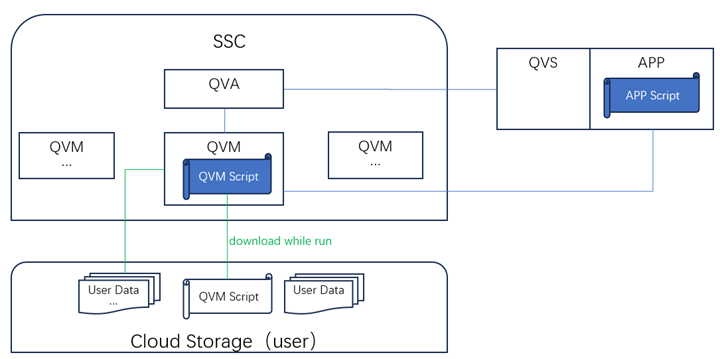
An application on SSC has two parts: the server side, which consists of QVA and QVM, and the application side, which consists of the application itself (simply written as APP in the following part) and QVS. Both parts involve the use of SPL scripts. The SPL script on the server side is executed on QVM and thus called QVM script. On the application side, another SPL script is written to call the QVM script and it is called APP script.
The basic procedure is like this: APP calls the APP script that sends a computation request to QVS; QVS then applies to QVA for computing resource QVM; APP connects to the obtained QVM and the latter executes QVM script; return the computing result to APP script and then back to APP.
Both the user data and the QVM script are stored in the cloud object storage, and will be downloaded to QVM for execution. The APP script is deployed together with APP and can be stored locally or on the cloud.
1. Account and Storage
1. Register for SSC account
As SSC supports multiple public cloud providers (AWS/GCP/Azure), there are different register addresses on the SSC management side. The address for AWS is http://sscaws.scudata.com/qva and the Region is us-west-1. The register address could be changed and make sure you pay attention to the official announcement.
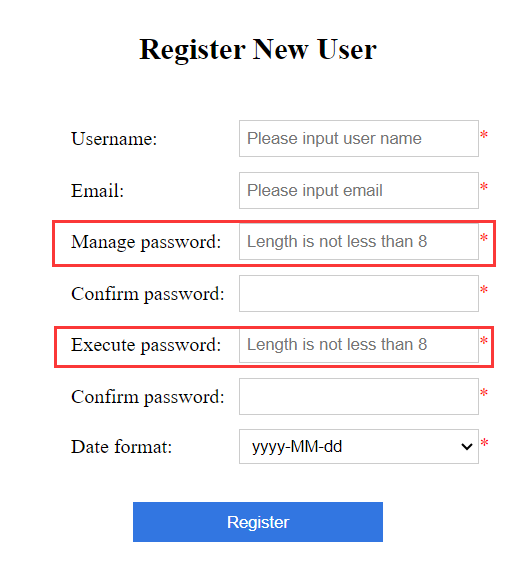
The registration process is simple. Note that there are two passwords – administrator password and execution password – for one SSC account (username). The two passwords should not be confused. Use the administrator password to login to the website and manage the account and service; enter the execution password to the QVS configuration file for QVS accessing QVA to obtain QVM and execute the script.
After finishing the registration, log in to your account using the administrator password. Now you can maintain or manage the account.
No charge for the trial phase, and no charging interface is provided.
2. Create user’s own cloud storage
Unlike general cloud data warehouses, SSC neither stores users’ data and scripts nor charges for the storage. Users’ data and scripts are stored in the public cloud providers’ object storage, which also called cloud storage. Users need to create their own cloud storage accounts and get the connection information, through which SSC accesses data in cloud storage. Different providers offer different cloud storage services. AWS offers S3, GCP provides GCS and Azure has Blob. We will take S3 as an example to explain how to get connection information of cloud storage.
1.Region. Region is one of the four connection parameters. It is strongly recommended that you use the cloud storage located in the same region as SSC because S3 cloud storage service is distributed in multiple Regions and may be charged less within the same region (the public cloud storage does not charge for data transmission); otherwise, the provider will charge for the cross-region replication.
2.endpoint. Related to region, endpoint is another of the four connection parameters. The general S3 protocol is protocol://s3.“region”.amazonaws.com, such as https://s3.us-west-1.amazonaws.com. You can reference documentation of each cloud storage service for the detailed rules. AWS documentation is provided in https://docs.aws.amazon.com/general/latest/gr/rande.html#s3_region, where you can find endpoint description for the location of the current browser.
3.Apply for accessKey and secretKey. Login to S3 and get into account->Security credentials menu and apply through the “Create access key” link on the interface.
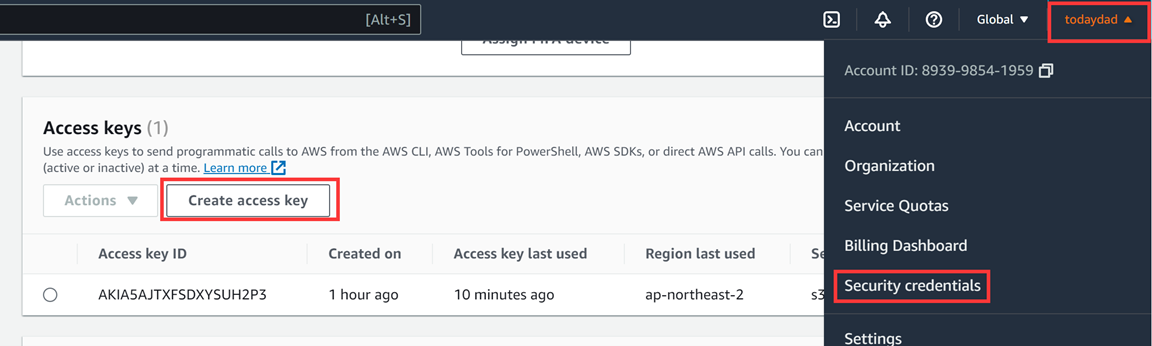
Remember the Access Key and the Secret Key after the application succeeds. The two strings are the other two of the four connection parameters, and correspond to account and password respectively.

The complete connection information is like this:
region:us-west1
endPoin:https://s3.us-west-1.amazonaws.com
accessKey:AKIA5MD7AFM2KJYIIW6B
secretKey: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
3. Download and install QVS
QVS is the abbreviation of QDBase Virtual Service, which receives and handles computation requests and needs to be installed on user’s server. The server type can be local, private cloud or public cloud; operating system can be Windows, Linux or Mac. Public cloud + Linux is the commonly seen combination. Using the public cloud in the same region as SSC could reduce data transmission fees. Take AWS EC2 as an example, the following explains how to install and deploy QVS.
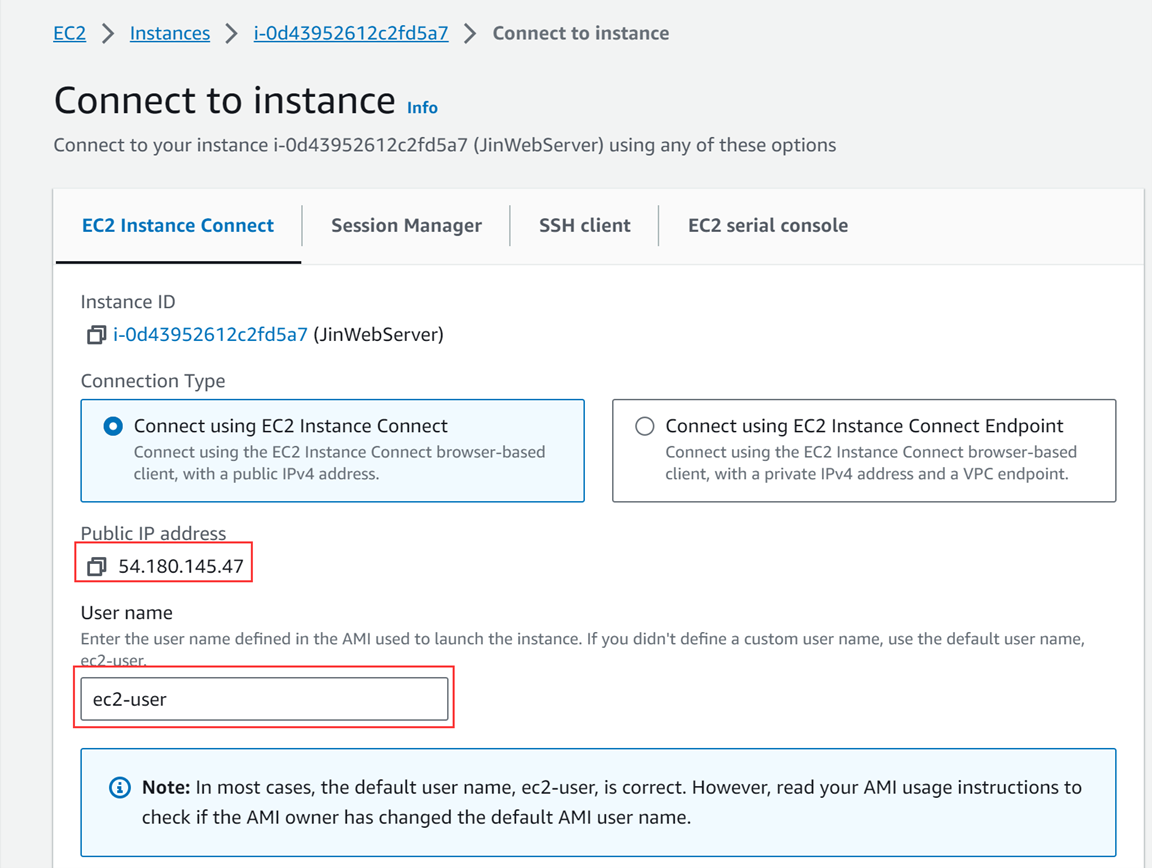
1. Apply and start EC2. Create a new Linux instance on AWS console and remember the public IP address, which is QVS IP address, after EC2 is started.
2. Get SPL Enterprise edition. QVS is one of the components of SPL Enterprise edition. To use QVS, you need to install SPL Enterprise edition, which can be found on the Download page in Scudata official website: http://www.scudata.com.
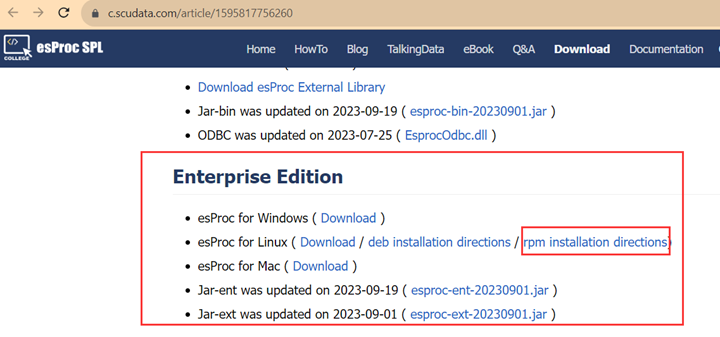
3. Install SPL Enterprise edition. The installation package types are different for different Linux versions. With the RPM package, for example, we perform the operations according to directions the link provides. The key steps include downloading SPL on EC2 using wget command and installing it with rpm command. The QVS root directory after installation is called QVS installation directory in the following part.
Note: You may meet “not enough space but there is plenty” error during installation. The reason that causes this error is generally that the temporary directory /temp is too small. So, extend the directory to at least 1GB.
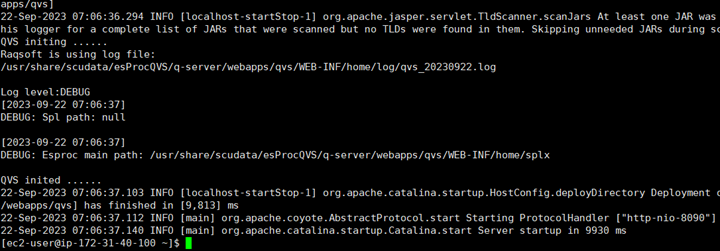
To check whether the installation is correct, you can first start QVS – the path is QVS installation directory/esProc/q-server/bin/startup.sh – before configuration. View the log output on Tomcat console using tail or one of other commands. The result should be like this:
4. Download and install IDE
IDE is SPL script’s integrated development environment. It is one of the components of SPL Enterprise edition. To use IDE, you need to install SPL Enterprise edition. IDE is usually installed in the developer’s GUI desktop environment and supports Windows/Linux/Mac. Refer to the above to download the SPL Enterprise edition. The one-click installation is simple. The IDE root directory after installation is called IDE installation directory in the following part.
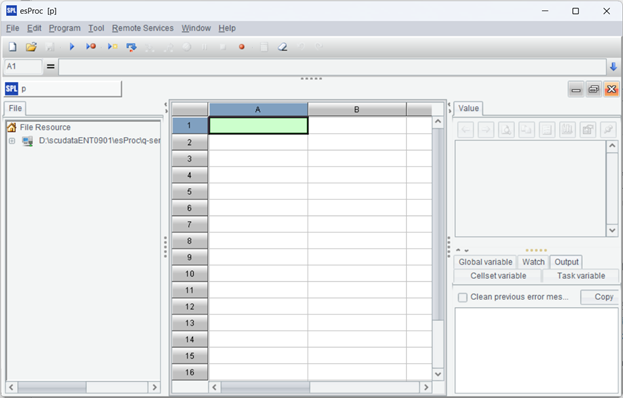
To check whether the installation is correct, you can first start IDE – the path is IDE installation directory/esProc /bin/esproc.exe – before configuration. There is a striking IDE icon on the desktop. The interface after startup is as shown below:
2. Debugging QVM script locally
Develop and debug a SPL QVM script on IDE locally to access data files in cloud storage, and upload the finished script to the cloud storage to be called by the application from the IDE.
1. Configure IDE
1. Copy the class library for accessing cloud storage. Take S3 as an example, copy the jars under IDE installation directory\esProc\q-extlib\s3 to IDE installation directory\esProc\lib.
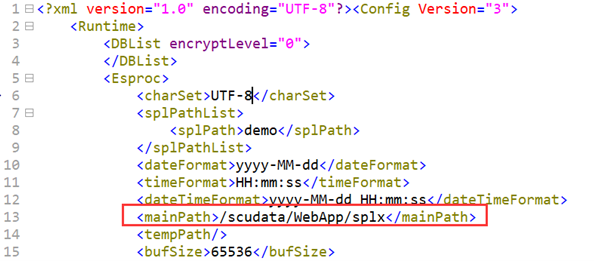
2. Modify configuration file, where the IDE main directory is particularly important. Run IDE installation directory\esProc\bin\esproc.exe (esproc.sh) to start IDE, and then click Tool->Options on IDE menu to find “Main path”, which is IDE main directory.
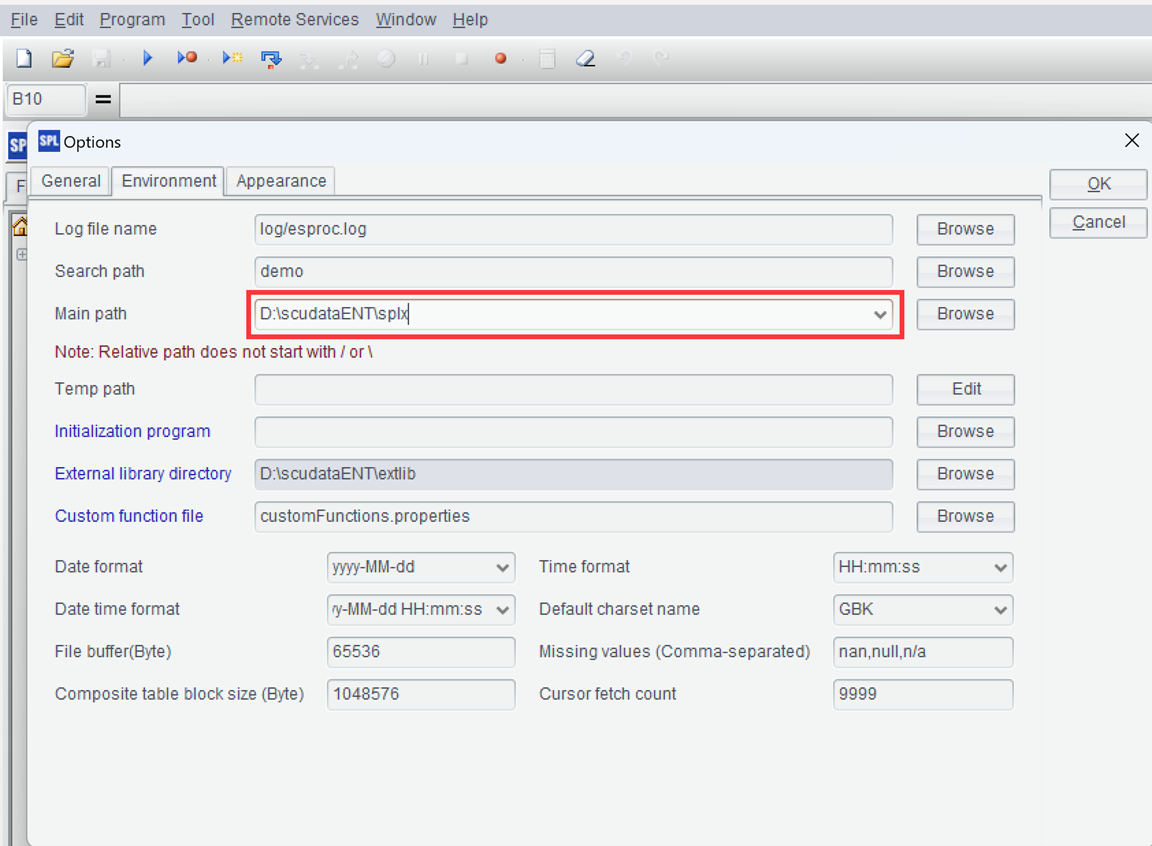
The IDE main directory is the root directory containing the script and data files; default path (when the “Main path” property is left blank) is IDE installation directory\esProc, and you should navigate to the target or enter an appropriate path. Besides, modify other configuration properties as needed.
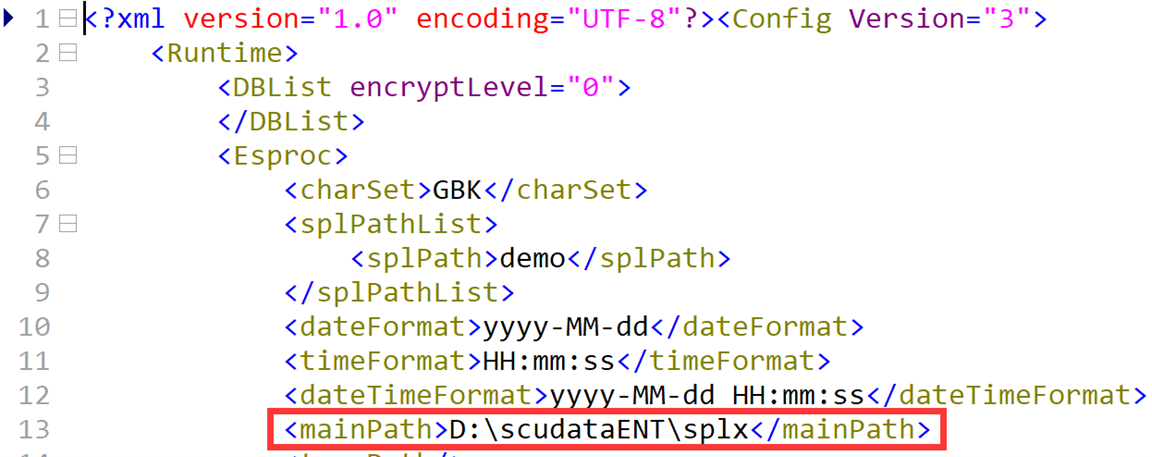
You can also modify the configuration file, whose path is IDE installation directory\esProc\config\raqsoftConfig.xml, manually.
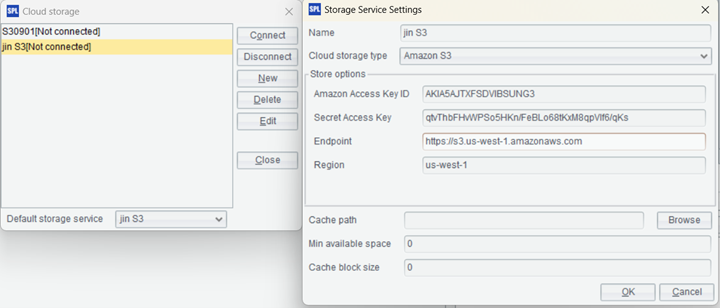
3. Activate cloud storage context in IDE. Click “Remote Services->Storage Service Settings” on the menu to create a S3 cloud storage enter the S3 connection information applied for above, and click “Connect” button to activate the cloud storage. Later this default cloud storage will be used when you execute the cloud storage function in script.
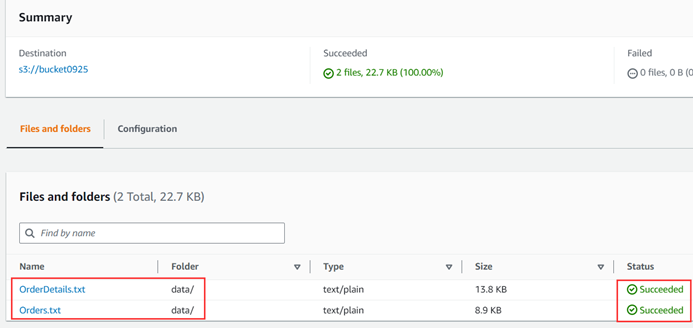
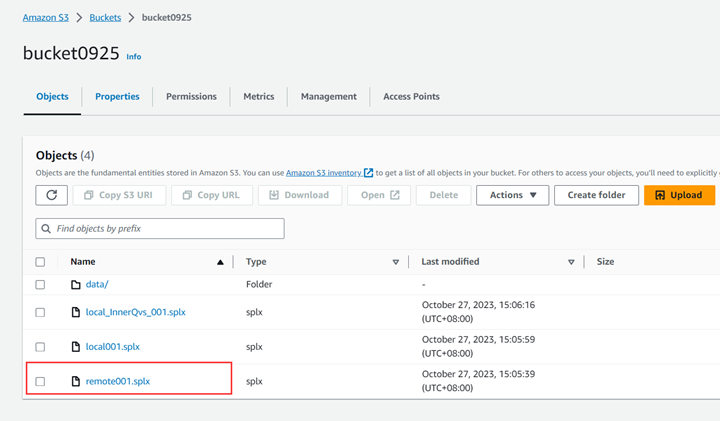
2. Upload data files manually
Upload data files before writing the SPL script. Take S3 as an example, you get into the Amazon management side, create a storage bucket according to the default parameters, and upload data directory and the two txt files in it. The result should be like this:
SSC supports data files of various formats, including btx and ctx for high-performance computations. Besides uploading files manually, you can also upload them using a script. We will talk about this later.
3. Develop and debug QVM script
Write QVM script in the activated remote storage (cloud storage) context and perform fully-featured debugging in IDE. For example, script remote001.splx performs grouping & aggregation on two txt files stored in cloud storage and filtering by external parameters:
| A | B | |
|---|---|---|
| 1 | =Qfile(“bucket0925/data/Orders.txt”).import@t() | Data files in cloud storage |
| 2 | =Qfile(“bucket0925/data/OrderDetails.txt”).import@t() | |
| 3 | =join(A1,order_id;A2,order_id) | Join |
| 4 | =A3.groups(#1.customer_id; count(1):cnt,sum(#2.item_qty):amt) | Grouping & aggregation |
| 5 | =A4.select(amt>arg1 && amt<=arg2) | Filtering by external parameters |
Note: Use a function starting with Q to access cloud storage, such as Qfile used in the above code. They are different from the file function for accessing the local file system. This piece of code can run in both IDE and QVM to read data files in cloud storage.
Once developed and debugged, a QVM script needs to be uploaded to the cloud storage for use in the integrated application environment (or the remote debugging environment). Like the above data files, you can also upload the QVM script manually.
4. Upload files using script
In addition to uploading data files manually on the cloud storage interface, you can upload them through a script.
Create a directory having same name as the storage bucket under the IDE main directory, copy remote001.splx, the above edited QVM script, to it, and execute the following script in IDE to upload it:
| A | B | |
|---|---|---|
| 1 | >Qload(“bucket0925/remote001.splx”) | Upload to cloud storage |
Then you can view the uploaded file on S3 management side:
You can use Qload to upload any files conforming to the cloud storage rules, including above mentioned data files, or to download files in cloud storage to the local. Find related functions and detailed information in HERE.
3. Invoking QVM script from APP
In the integrated environment, the Java application executes SPL APP script through the QJDBC provided by SSC. We can execute the APP script locally without accessing the QVS service; or use the Qconnect function to access QVS, which then requests QVA to assign a QVM to execute the QVM script.
There are two running modes for QVS: independent QVS and embedded QVS. For the independent QVS, we deploy the QVS service on the LAN, a private cloud, or a public cloud, which is the most recommended, in the regular way. The download and installation processes are already explained above. The embedded QVS refers to the QVS service started once during the Java process. Each time when Qconnect function is executed using QJDBC in the later computations, the embedded QVS is by default accessed without the need to write IP address explicitly.
1. Without QVS service
The basic use of QJDBC is that no QVS service is accessed and a regular SPL script is executed only in Java.
1. Deploy QJDBC
Find the following four jars in “QVS installation directory\esProc\q-server\webapps\qvs\WEB-INF\lib” and copy them to the Java application’s class path:
ecloud-XXXXXXXX.jar
esproc-bin-XXXXXXXX.jar
esproc-ent-XXXXXXXX.jar
esproc-ext-XXXXXXXX.jar
Copy “QVS installation directory \esProc\q-server\webapps\qvs\WEB-INF\home\ raqsoftConfig.xml” to Java class path and modify its content as needed. The mainPath for locating the root directory containing the script and the local data files is the focus. There is a similar configuration file in IDE.
2. Write APP script
Write an APP script unrelated to SSC. For example, we perform computations in Basic001.splx using local text files:
| A | B | |
|---|---|---|
| 1 | =file(“bucket0925/data/Orders.txt”).import@t() | Local file |
| 2 | =file(“bucket0925/data/OrderDetails.txt”).import@t() | file function |
| 3 | =join(A1,order_id;A2,order_id) | Join |
| 4 | =A3.groups(#1.customer_id; count(1):cnt,sum(#2.item_qty):amt) | Grouping & aggregation |
| 5 | =A4.select(amt>arg1 && amt<=arg2) | Filtering by external parameters |
3. Java integration code
Invoke the above APP script Basic001.splx through QJDBC in Java. The code is same as that for calling a database stored procedure.
        java.sql.Connection con = null;
        java.sql.PreparedStatement st=null;
        try{
            Class.forName("com.esproc.jdbc.QDriver");
            con= DriverManager.getConnection("jdbc:esproc:q:local://");
            st =con.prepareCall("call bucket0925/Basic001(?,?)");
            st.setFloat(1,500);
            st.setFloat(2,600);
            st.execute();
	…
2. Independent QVS service
Based on the above steps, we just need a few modifications to be able to use the SSC. In this section, we explain how to invoke the independent QVS service.
1. Modify configuration file of the independent QVS service: The file is “QVS installation directory\esProc\q-server\webapps\qvs\WEB-INF\home\qvsConfig.xml”.
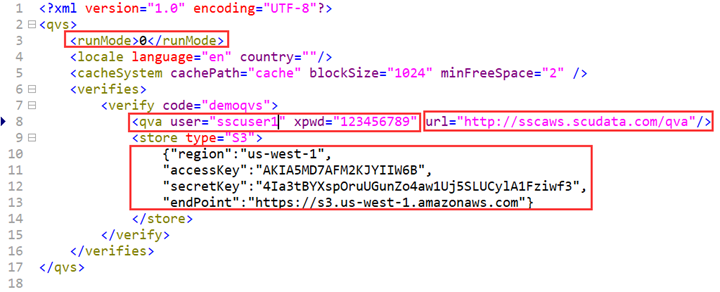
runMod: Change value to 0 to mean the running mode instead of debugging mode.
user/xpwd: SSC account and execution password.
url: SSC management IP address, which is also the QVA address.
store: Cloud storage connection information; it has four parameters.
2. Start the independent QVS service: The command path is QVS installation directory/esProc/q-server/bin/startup.sh.
3. QJDBC deployment configuration: No need to change; it is the same as that for “without QVS service”.
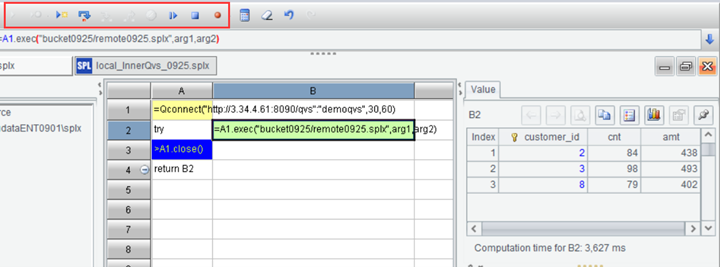
4. Access the independent QVS in APP script:
| A | B | |
|---|---|---|
| 2 | =Qconnect(“http://3.34.4.61:8090/qvs”:“demoqvs”,30,60) | Connect to the independent QVS service; the first parameter is the QVS service’s IP address |
| 3 | try | =A1.exec(“bucket0925/remote001.splx”,arg1,arg2) |
| 4 | >A1.close() | |
| 5 | return B2 |
Note: bucket0925/remote001.splx is a QVM script in cloud storage, which is already explained in the previous sections.
5. Java integration code: No need to change. Remember to release the Statement, otherwise the QVM resources will be used up.
3. Embedded QVS service
The embedded QVS is a type of QVS embedded in a Java application. It does not support debugging mode and data maintenance, and cannot use the global lock and global variable.
1. Deploy and configure QJDBC:
First, copy the jars QVS uses to Java application class path; the jars are located in “QVS installation directory\esProc\q-server\webapps\qvs\WEB-INF\lib”. Then, copy the jars cloud storage uses to Java application class path; jars for S3 are located in IDE installation directory\esProc\q-extlib\s3. Finally, put QVS configuration file to Java application class path (also can be an absolute path); configure the file according to the independent QVS service configuration file.
2. Prepare the APP script, which should access the embedded QVS service and invoke the QVM script. For example, below is APP script local_InnerQvs_001.splx:
| A | B | |
|---|---|---|
| 1 | =Qconnect(:“demoqvs”,30,60) | |
| 2 | Try | =A1.exec(“bucket0925/remote001.splx”,arg1,arg2) |
| 3 | >A1.close() | |
| 4 | return B2 |
Note: The embedded QVS service IP address is meaningless, so Qconnect function’s first parameter is empty.
3. Java integration code
First, start the embedded QVS service once through the static method. To do this, you need to specify the QVS configuration file using the class path or absolute path. Generally, this is executed at application or module initiation stage. Below is the corresponding Java code:
com.scudata.ecloud.server.QVS.init("/qvsConfig.xml");
Then we can execute the APP script within the business module. The Java code is the same as that for invoking a database stored procedure:
	Connection con = null;
        java.sql.PreparedStatement st=null;
        try{
            Class.forName("com.esproc.jdbc.QDriver");
            con= DriverManager.getConnection("jdbc:esproc:q:local://");
            st =con.prepareCall("call bucket0925/local_InnerQvs_001(?,?)");
            st.setFloat(1,500);
            st.setFloat(2,600);
            st.execute();
4. Debugging APP script locally
We can develop and debug an APP script in IDE locally. Use Qconnect function to connect to QVS, which will apply for QVM through QVA, and to execute the QVM script stored in cloud storage on QVM. There are two types of deployment for QVS: independent QVS service and the QVS service with embedded IDE.
1. Configure and start independent QVS service
Usually, we deploy the independent QVS service on the public cloud, such as EC2. Find related information in the previous sections.
2. Write QVM script and upload it to cloud storage
See the previous sections for detailed explanations, like remote001.splx used above:
| A | B | |
|---|---|---|
| 1 | =Qfile(“bucket0925/data/Orders.txt”).import@t() | Data file in cloud storage |
| 2 | =Qfile(“bucket0925/data/OrderDetails.txt”).import@t() | |
| 3 | =join(A1,order_id;A2,order_id) | Join |
| 4 | =A3.groups(#1.customer_id; count(1):cnt,sum(#2.item_qty):amt) | Grouping & aggregation |
| 5 | =A4.select(amt>arg1 && amt<=arg2) | Filtering by external parameters |
3. The APP script used for independent QVS
The APP script can use the Qconnect function to access QVS, which applies for QVM through QVA, and download QVM script from the cloud storage and execute it.
| A | B | |
|---|---|---|
| 2 | =Qconnect(“http://3.34.4.61:8090/qvs”:“demoqvs”,30,60) | Connect to the independent QVS service; the first parameter is the QVS service IP address |
| 3 | Try | =A1.exec(“bucket0925/remote001.splx”,arg1,arg2) |
| 4 | >A1.close() | |
| 5 | return B2 |
4. Debug APP script
Perform full-featured debugging over the APP script in IDE.
The above explains how to use the independent QVS service. Now we move on to the embedded QVS service.
5. Configure and start embedded QVS service
Find QVS service configuration file, whose path is “QVS installation directory\esProc\q-server\webapps\qvs\WEB-INF\home\qvsConfig.xml”. Modifying the file in the same way as configuring the independent QVS service, and copy the file to “IDE installation directory\esProc\config”.
Start IDE and the QVS embedded in it will also be started.
6. The APP script used for embedded QVS
Write a script for accessing the embedded QVS service in IDE:
| A | B | |
|---|---|---|
| 1 | =Qconnect(:“demoqvs”,30,60) | |
| 2 | Try | =A1.exec(“bucket0925/remote001.splx”,arg1,arg2) |
| 3 | >A1.close() | |
| 4 | return B2 |
Note: The embedded QVS service IP address is meaningless, so Qconnect function’s first parameter is empty; QVM script is unrelated to the QVS deployment type, so no modification is needed. We can also perform the full-featured debugging over the APP script used for embedded QVS. The development and debugging method is the same as that used for independent QVS.
7. Deploy APP script in APP
The APP script can be deployed in the application once it is developed and debugged. There are two types of APP script: for independent QVS and for embedded QVS. For the two types of QVS deployment in the Java application, there are two types of Java code for them, which are explained in the previous section.
5. Debugging QVM script remotely
When debugging the script development, the debugging environment reads data from S3 (sometimes write data to it). Network traffic charges would be incurred if the debugging environment is local; but there are no traffic charges if the debugging environment and S3 are within the same region (though a small amount of IDE and QVS debugging traffic is generated). SSC offers remote debugging mode for QVM script.
Install another QVS to debug QVM script, configure it as debugging mode and make it only responsible for remote debugging; it is logically unrelated to the original independent QVS (since they share a lot of configurations, the remote debugging feature is also implemented in QVS service). After the two QVS services are started, the local IDE connects to the debugging QVS, read cloud storage information and list it in tree structure for maintenance by developers. Now we can add, delete, modify QVM scripts (including data files) and then debug them. Though QVM script is debugged in IDE, the actual execution process is on the debugging QVS and is synchronized to IDE in real time for the intuitive observation.
1. Configure and run debugging QVS
1. Modify QVS configuration. The path of configuration file is QVS installation directory\esProc\q-server\webapps\qvs\WEB-INF\home\qvsConfig.xml. Three changes need to be made:
1) Modify running mode and configure runMode=1, which represents debugging mode.
2) Comment node to disable the SSC account. This step is optional because SSC account information won’t be read for runMode=1 whether is commented or not.
3) Comment node to enable the use of file system for storage instead of cloud storage. Retaining the node means that both main directory storage and cloud storage are used. Keeping it can bring in the highest possible compatibility.

2. Modify SPL configuration on QVS. The configuration file path is QVS installation directory\esProc\q-server\webapps\qvs\WEB-INF\home\raqsoftConfig.xml. The focus is the main directory, mainPath, which is QVS’s root directory and can be an absolute path or a relative path. A relative path is relative to QVS installation directory\esProc\q-server\webapps\qvs\WEB-INF\home.
Finally, start the QVS service.
2. Connect to and debug QVS from IDE remotely
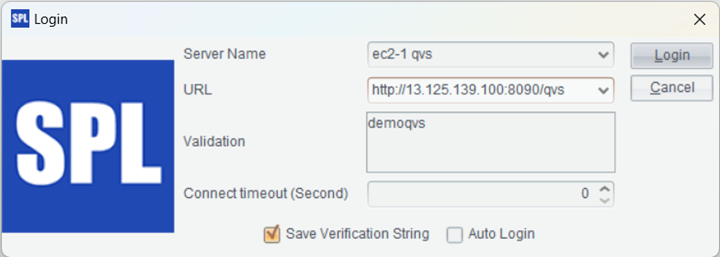
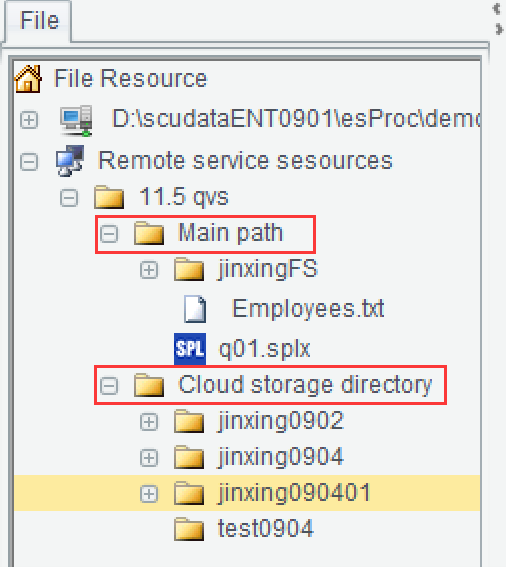
Start IDE, click “Remote Services -> Login” on the menu bar, enter QVS connection information in the window and login to QVS.
Once logged in, file resources in QVS will be displayed on the left side of the IDE. “Main path” is the file system directory; “Cloud storage” commands files in cloud storage.
Now the IDE only shows the execution result on the remote server instead of executing the script. The current IDE is in essence logically unrelated to the original IDE. But, as they share a lot physically, we put them in the same application (EXE).
3. Upload and debug script and other related files
Choose a directory under “Cloud storage” in the left side file resources list, such as test0904, right-click and select “Upload file” in the pop-up menu to get into the upload interface.
To make it more conveniently, you can enter a subdirectory after the existing upload path, like changing “test0904” to “test0904/function”. This also achieves the effect of creating the second-level directory “function”. Note: double slashes (\) are not allowed; you cannot create a first level directory this way.

Click “Upload File” button to upload, and close the “Upload File” interface after upload is finished. The newly created second-level directory will automatically appear in IDE; expand the directory and there is the newly uploaded file:

Use the same way to upload data files.
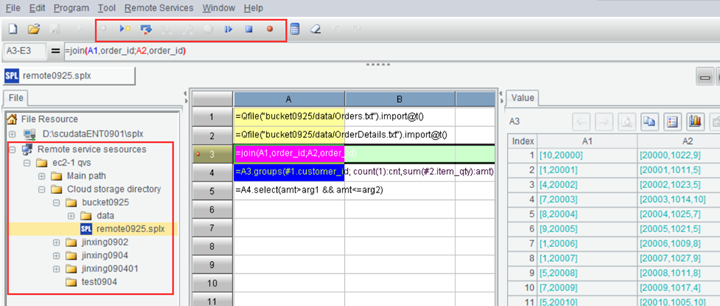
4. Execute/debug script remotely
Double click the uploaded script to open the corresponding script stored in cloud, then we can modify, delete, save, execute and debug it remotely. The actual debugging process takes place on QVS, but the execution result will be synchronized to the local IDE.
6. Debugging APP script remotely
For the same purpose of saving network traffic charges, we can debug APP script remotely. Similarly, we need to start two QVS services – running mode for one and debugging mode for the other. Then we login to the debugging QVS from the local IDE and read cloud storage information on the QVS to maintain the APP script and data. The code in APP script connects to the running QVS through Qconnect function and applies for QVM to execute QVM script. Though APP script is debugged in IDE, the actual debugging process is on the QVS and is synchronized to IDE in real time for the intuitive observation.
1. Configure and start running-mode QVS
The running mode QVS refers to the general independent QVS. It is usually deployed in the public cloud (such as EC2). It is important that you configure runMode=0 in qvsConfig.xml. See previous section for related information.
2. Configure and start debugging-mode QVS
As we explained in the previous section, you should configure runMode=1 in qvsConfig.xml. See previous section for related information.
We can deploy the running mode QVS and the debugging mode QVS in different servers, or deploy them as two applications in one Web service. For convenience of maintenance, we can modify and debug QVS’s URL, application name and directory name (such as debug). Keep them unchanged for running mode QVS (still be qvs).
3. Connecting to remote QVS from IDE
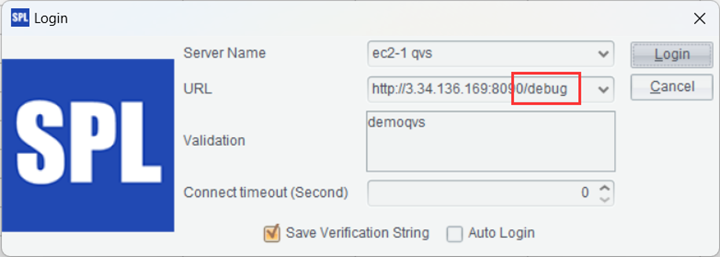
Start IDE, click “Remote Services -> Login” on the menu bar, enter debugging QVS connection information in the window and login to QVS.
4. Upload data files and script
The process of uploading data files and script is similar to the previous. Here it is the APP script that we need to upload. The Qconnect function in the APP script connects to the independent QVS service.
| A | B | |
|---|---|---|
| 2 | =Qconnect(“http://3.34.136.169:8090/qvs”:“demoqvs”,30,60) | Connect to the independent QVS service; the first parameter is the QVS service IP address |
| 3 | try | =A1.exec(“bucket0925/remote001.splx”,arg1,arg2) |
| 4 | >A1.close() | |
| 5 | return B2 |
5. Execute/debug script remotely
Double click the uploaded script to open the corresponding script stored in cloud, then we can modify, delete, save, execute it to perform remote debugging.

SPL Official Website 👉 https://www.scudata.com
SPL Feedback and Help 👉 https://www.reddit.com/r/esProcSPL
SPL Learning Material 👉 https://c.scudata.com
SPL Source Code and Package 👉 https://github.com/SPLWare/esProc
Discord 👉 https://discord.gg/2bkGwqTj
Youtube 👉 https://www.youtube.com/@esProc_SPL


Chinese version