

esProc Elastic Compute Service Work Procedure
esProc Elastic Compute Service (ECS) is a general computing software running on enterprise-class LAN and proprietary cloud. It has three components. The service-side consists of QVA and QVM; the application-side is made up of the esProc ECS application (hereinafter called APP) and QVS; the storage-side is NFS, HDFS or an object storage system compatible with S3 protocol. Both the service-side and the application-side involve the SPL script. At the service-side, the SPL script is executed on QVM and it is also called QVM script. On the application-side, a SPL script is needed to call the QVM script and it is called APP script.
Basic work procedure: APP calls the APP script through which it requests QVS to perform the computation; QVS then asks QVA for QVM computing resources and APP connects to the granted QVM; QVM executes the QVM scrip, returns the obtained result to APP script and then to the APP.
User data and QVM script are usually stored on the storage side, and will be downloaded to QVM at the time of execution. And the APP script is deployed along with the APP.

Ⅰ QVA account and ECS storage
1. Install and deploy QVA
QVA is the abbreviation of QDBase Virtual Allocator, which is the system responsible for allocating QVM computing resources and administering the account. QVA has the appearance of a Web application and is compatible with Windows, Linux and Mac, among which Linux is the most often used.
1. Download esProc Enterprise edition. QVA, QVM, QVS and IDE, all of them are components of the application. To use QVA, we need to install esProc Enterprise. The download is offered in SCUDATA official website http://www.scudata.com.
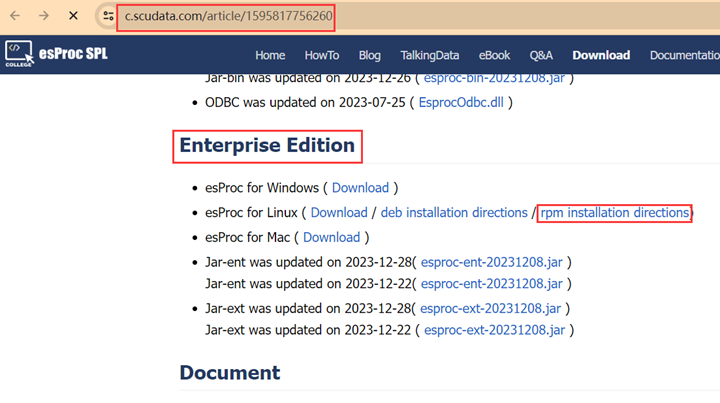
2. Install esProc Enterprise. Different Linux versions require different formats of installation packages. Here we take rpm packages as an example, and you can perform operations according to directions in the hyperlink. The key step is using wget command to download the package and rpm command to install the application. The QVA root directory after setup is called esProc installation directory hereinafter.
Note: It is possible that a “Not enough space” prompt appears during setup. Usually this results from a small-size temp folder (/tmp). Just increase the folder size to at least 1GB.
3. Configure Web Server. Here is the default directory structure after setup:
esProcinstallationdirectory
common(JDK\JDBC)
  esProc
    …
    bin(IDE)
    qvm
    qva
    q-server(Tomat)
      webapps
        qvs
QVA is located in qva directory. It can be deployed as an ordinary Web application in the user’s existing Web Server. It can be also deployed in the SCUDATA built-in Tomcat, which is in q-server directory, for your convenience. QVS is by default deployed in the q-server directory, and we can simply move it out and move QVA in, as shown below:
esProcinstallationdirectory
  common
  esProc
    …
    bin
    qvm
    qvs
    q-server
      webapps
        qva
Now the QVA module needs q-server directory and common directory only. And we can delete the other directories to save space.
We can run Tomcat using the default configurations, or change the configurations according to Tomcat rules and requirements. For example, we can edit esProc installation directory/esProc/q-server/conf/server.xml to change the default port number 8090.
4. Configure QVA. To do this, edit esProc installation directory/esProc/q-server/webapps/qvs/WEB-INF/home/qvsConfig.xml.
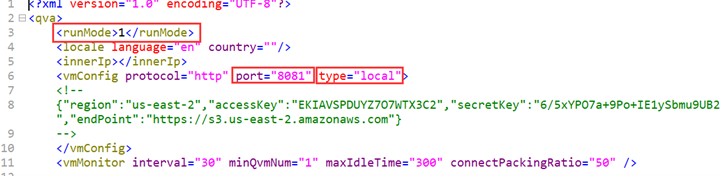
There are three key configuration items:
runMode: Specifies running mode. Value 1 represents the enterprise-class elastic computing; the other is the public cloud model, which won’t be covered in this essay.
port: The unified port number in QVM; default is 8081.
type: QVM server type. Should be configured as local; the other is the public cloud model, which won’t be covered in this essay. under is the public cloud QVM address, which won’t be covered in this essay.
5. Start QVA. Execute Tomcat startup program, which is esProc installation directory/esProc/q-server/bin/startup.sh, to start QVA. And use tail command to track the logs output to the Tomcat console.
2. Install and configure QVM
QVM is the abbreviation of QDBase Virtual Machine, which is esProc ECS’s computing resources. It is simple to download, install and configure QVM (Refer to that for QVS). Here are just the main points.
QVM configuration file is esProc installation directory/esProc/qvm/conf.properties. The key configuration item is port number server.port, which should be the same as that in QVA and the other QVM ports.
QVM isn’t a Web application in appearance. There is no need to deploy it in Web Server. We can execute esProc installation directory/esProc/qvm/qvm-start.sh to start the QVM.
3. Manage QVM instances
A special feature of esProc ECS is that it can dynamically add or remove QVM instances as needed. In order to manage QVM instances under the QVA, esProc provides the special management side.
When QVA and one or more QVMs are started, use your browser to open QVA management side using URL http://qva domain name or IP: port number/qva (default port number is 8090), such as http://192.168.12.13:8090/qva. Use admin account admin to manage QVM; the default password is 88888888. Log in the account and click Instance Manager->Add Instance to add QVM instances one by one.
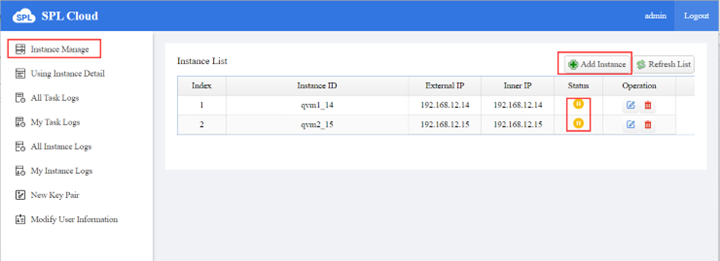
When QVM runs normally and in the idle status, “Status” icon is displayed as above. On the management side of the “Instance Manage” functionality, there are also ordinary functionalities, which we’ll just skip.
4. Create storage system
esProc ECS supports multiple types of enterprise-class shared storage, including NFS\HDFS and various object storage systems compatible with S3 protocol. We’ll take HDFS as an example in the following illustration.
Three information items are needed to access HDFS. They are username, hdfsPath and urlName, which represent user name, HDFS directory, and HDFS service URL respectively. The HDFS directory is usually the user’s main directory, whose format is “/user/username”, like /user/root. The urlName can be obtained from the administrator; you can also log in HDFS client side or any cluster node and enter hdfs dfs -df command to verify the service URL.

The first item in the returned result is urlName, which is hdfs://hadoop-master:9000 as shown in the above screenshot. The CPU name can be changed to the corresponding IP. Now we can have the complete information of accessing HDFS:
"urlName":"hdfs://192.168.13.2:9000",
"userName":"root",
"hdfsPath":"/user/root"
5. Create QVA account
esProc ECS offers the function of access control. The application requires legal QVA account and password to request computing resources. The official application should use a non-admin, ordinary account, which can be created on the management side.
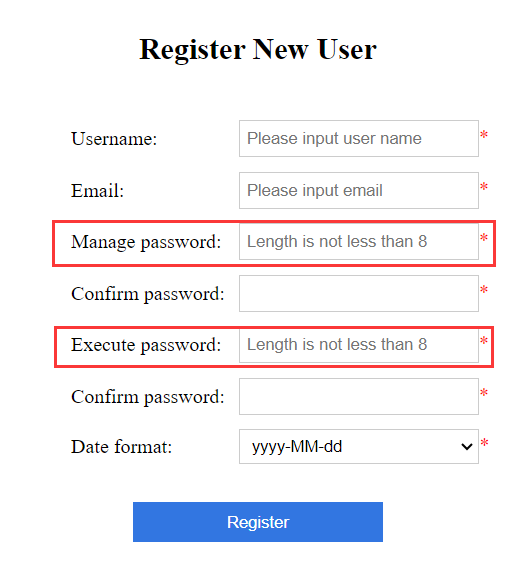
The registration process is simple. But note that there are two passwords for one account (username). One is the “manage password” and the other is the “execute password”. The two cannot be substituted for each other. The “manage password” is used to log in on the management side and manage the account and service; the “execute password” is typed in QVS configuration file to enable QVS to access QVA for getting QVM and executing the script.
After the registration, log into the QVA account using the “manage password” and you can manage and maintain the account. Note that an ordinary user can only manage their own computing tasks, logs and other information; they cannot manage the public QVM information.
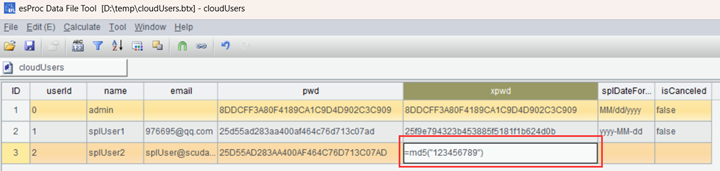
Besides user registration, administrators can also centrally configure user information in advance.
User information is stored in an open format btx file, which is esProc installation directory/esProc/q-server/webapps/qva/WEB-INF/home/cloudUser.btx. The administrator can use btx editor, which is esProc installation directory/esProc/bin/btx.exe, to edit the file. When editing user information, remember that the password must be encrypted (signed) using md5() function.
6. Install QVS
QVS is the abbreviation of QDBase Virtual Service, which receives and handles computing requests. It needs to be installed on user’s server. The OS can be Windows\Linux\Mac, and the most frequently used is Linux.
QVS is one of the modules of esProc Enterprise. Its installation process can refer to that of QVA. QVS is by default located in q-server directory, and it is started through esProc installation directory/esProc/q-server/bin/startup.sh.
The QVS configurations are closely related to its applications, which we will illustrate later.
7. Install IDE
IDE is the integrated development environment for SPL scripts. It is one of the components of esProc Enterprise. To use IDE, we need to first install the esProc Enterprise. IDE is usually installed in the developer’s GUI desktop environment and also supports Windows/Linux/Mac. Download esProc Enterprise (the method was explained above) and install it in one click. The process is simple.
To check whether the installation is successful, we can first start IDE before deployment through the URL esProc installation directory/esProc/bin/ esproc.exe. There is also an eye-catching IDE icon on the desktop. The IDE interface after startup is like this:
Ⅱ Debug QVM script locally
Develop and debug the SPL QVM script on IDE locally. Data files in remote storage can be accessed through the script. Then upload the script to the remote storage for invocation by applications at an integrated environment.
1. Deploy IDE
1. Copy remote storage interface class library. For HDFS, for example, we need to copy jars in esProc installation directory\esProc\q-extlib\hdfs to esProc installation directory \esProc\lib.
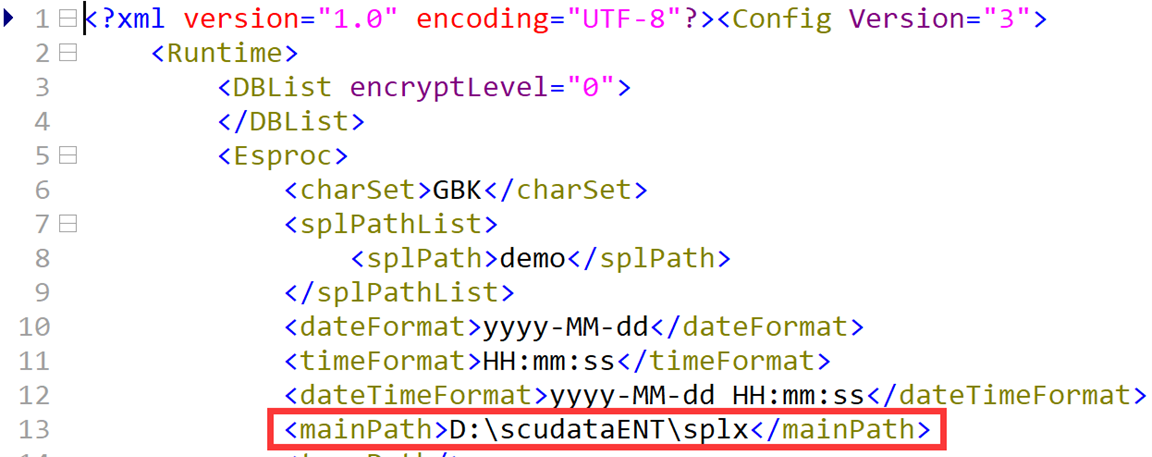
2. Modify the configuration file, where the IDE main directory is the key. First, run esProc installation directory\esProc\bin\esproc.exe (esproc.sh) to start IDE. Then find “Main path”, which is IDE main directory, through IDE menu item Tool->Options.
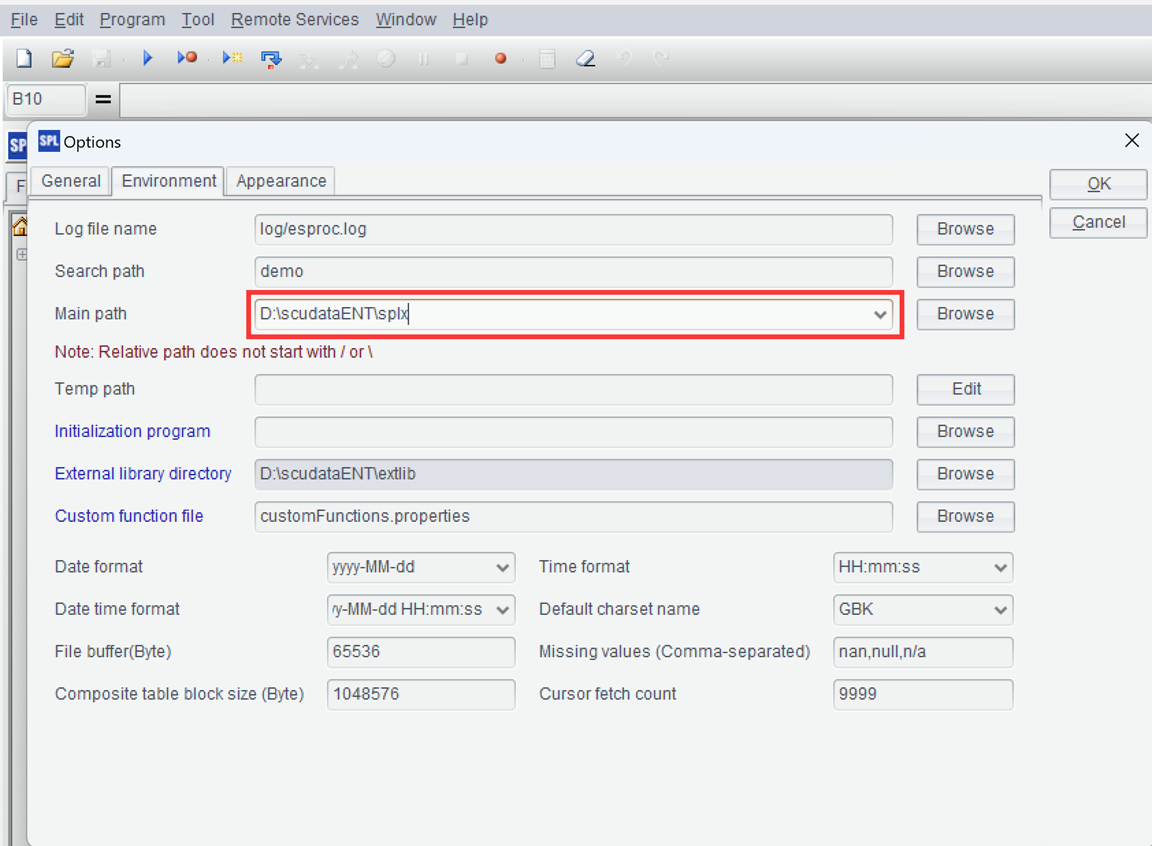
The IDE main directory is the root directory accommodating QVM scripts and data files. The default path (when left blank) is esProc installation directory\esproc, and we should navigate or enter the appropriate path. Edit the other configuration items as needed.
Or we can edit the configuration file manually. It is located in esProc installation directory\esProc\config\raqsoftConfig.xml.
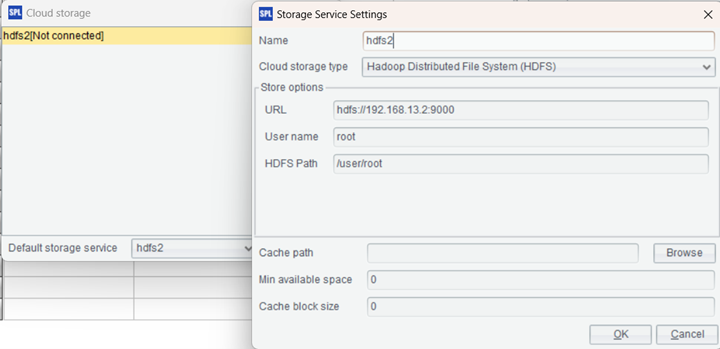
3. Activate remote storage context in the IDE. Open menu item “Remote Services->Storage Services Setting”, create a new HDFS remote storage, enter the HDFS connection information previously requested, and click “CONNECT” button to finish the activation. Later the script will by default use the remote storage specified here when executing a remote storage function.
2. Manually upload data files
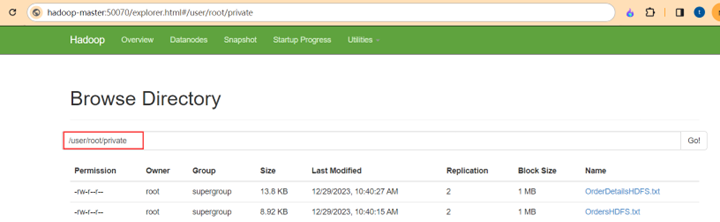
We need to upload data to the remote storage before writing a SPL script. Take HDFS as an example. First, we log in on HDFS client side or a cluster node, create a directory (such as private) using hdfs dfs -mkdir command, upload data files using hdfs dfs -put command, and view the upload result through hdfs df -ls command. The result is as follows:

We can also view the uploaded files on HDFS web console:
esProc supports multiple data file formats. It uses btx and ctx file formats to implement high-performance computations. In addition to the above-mentioned manual uploading, SPL also allows uploading data files using a script, which we will talk about later.
3. Develop and debug QVM script
Write a QVM script in the activated remote storage context and perform full-featured debugging in IDE. For example, we have a script remote002.splx, which groups and summarizes two txt files stored in remote storage and filters data according to the external parameters.
| A | B | |
|---|---|---|
| 1 | =Qfile(“private/OrdersHDFS.txt”).import@t() | A data file in remote storage |
| 2 | =Qfile(“private/OrderDetailsHDFS.txt”).import@t() | |
| 3 | =join(A1,order_id;A2,order_id) | Association |
| 4 | =A3.groups(#1.customer_id; count(1):cnt,sum(#2.item_qty):amt) | Grouping & aggregation |
| 5 | =A4.select(amt>arg1 && amt<=arg2) | Filtering by external parameters |
Note: We should use a function beginning with Q to access the remote storage, such as Qfile()used in the above script. Such a function is different from the file-handling functions for accessing the local file system. This piece of code can run both in IDE and on QVM to read data files in remote storage. When no remote storage is configured, Qfile() function works according to the logic of a file-handling function.
After a QVM script is developed and debugged, it also needs to be uploaded to remote storage for use in the application’s integrated environment (or remote debugging environment). As data files mentioned above, the QVM script can also be uploaded manually.
4. Upload files using a script
Besides uploading files on remote storage interface manually, we can also perform the uploading through a script.
First, create a directory namesake with that in HDFS (such as private) in IDE main directory, copy the nely-edited QVM script* remote002.splx *to it, and then execute the following uploading script in IDE:
| A | B | |
|---|---|---|
| 1 | >Qload(“private/remote002.splx”) | Upload file to remote storage |
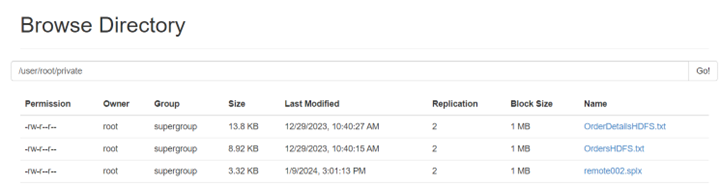
When execution is finished, we can view the newly-uploaded files on web console:
We can use Qload() to upload any files, such as data files mentioned in the previous sections, to remote storage if they conform to the remote storage requirements. We can also download files in remote storage to the local. Find more methods in Remote-service-related functions.
Ⅲ Call QVM script by APP
In the integrated environment, the Java application executes SPL APP script through esProc QJDBC. The APP script can only perform the computation locally without the need to access QVS service. We can also use QConnect() function to access QVS, which request a QVM for executing QVM script from QVA.
QVS has two running modes – independent QVS and embedded QVS. The former is QVS service deployed according to the ordinary way and on LAN/proprietary cloud. The download and installation process has been explained above. The latter is QVS service started once during a Java process, and later every time when QConnect() function is executed using QJDBC, QJDBC will by default access this embedded QVS without the need to write IP address explicitly.
1. Without QVS service
The basic use of QJDBC is that an ordinary SPL script is executed in Java without accessing QVS service.
1. Deploy QJDBC
In “esProc installation directory\esProc\q-server\webapps\qvs\WEB-INF\lib”, find the following four jar files and copy them to the Java application’s class path:
ecloud-XXXXXXXX.jar
esproc-bin-XXXXXXXX.jar
esproc-ent-XXXXXXXX.jar
esproc-ext-XXXXXXXX.jar
Copy “esProc installation directory\esProc\q-server\webapps\qvs\WEB-INF\home\ raqsoftConfig.xml” to Java class path and edit it as needed; the most important item is mainPath, which locates the root directory accommodating the script and the local data files. There is a similar configuration file for IDE.

2. APP script
Write an APP script unrelated to esProc ECS/QVS. For example, perform computation in Basic001.splx using a local text file:
| A | B | |
|---|---|---|
| 1 | =file(“private/OrderDetailsHDFS.txt”).import@t() | A local file |
| 2 | =file(“private/OrderDetails.txt”).import@t() | Use file() function to compute |
| 3 | =join(A1,order_id;A2,order_id) | Association |
| 4 | =A3.groups(#1.customer_id; count(1):cnt,sum(#2.item_qty):amt) | Grouping & aggregation |
| 5 | =A4.select(amt>arg1 && amt<=arg2) | Filtering by external parameters |
3. Java integration code
Call the above APP script (Basic001.splx) through QJDBC in Java. The code is the same as calling a database stored procedure:
java.sql.Connectioncon=null;
java.sql.PreparedStatementst=null;
try{
    Class.forName("com.esproc.jdbc.QDriver");
    con= DriverManager.getConnection("jdbc:esproc:q:local://");
    st =con.prepareCall("call private/Basic001(?,?)");
    st.setFloat(1,500);
    st.setFloat(2,600);
    //st =con.prepareCall("call jinxingFS/runOnQvmCloud()");
    st.execute();
	…
2. Independent QVS service
Based on the previous sections, we only need a slight change to use the elastic computing. In this section, the independent QVS service is called to achieve the target.
1. Edit the configuration file of independent QVS service. The file path is “esProc installation directory\esProc\q-server\webapps\qvs\WEB-INF\home\qvsConfig.xml”.
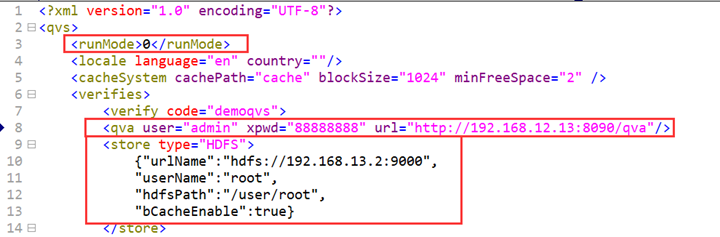
runMode: Change its value to 0, which represents running mode instead of debugging mode.
user/xpwd: Account and execute password for esProc ECS.
url: esProc ECS’s management-side address, which is also the QVA address.
store: Remote storage information. For HDFS, urlName, username and hdfsPath are connection information, and bCacheEnable specifies whether to enable cache or not (default setting is false, which means “do not enable cache”).
2. Start the independent QVS service. The command path is esProc installation directory/esProc/q-server/bin/startup.sh.
3. QJDBC deployment settings: No need to edit; they are the same as settings for “Without QVS service”.
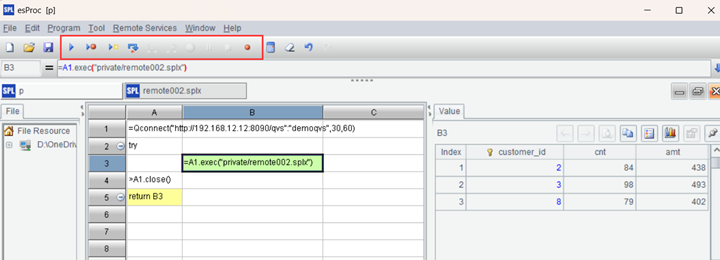
4. Access the independent QVS service in the APP script:
| A | B | |
|---|---|---|
| 2 | =Qconnect(“http://192.168.12.12:8090/qvs”:“demoqvs”,30,60) | Connect to the independent QVS service; the 1st parameter is independent QVS service address |
| 3 | try | =A1.exec(“private/remote002.splx”,arg1,arg2) |
| 4 | >A1.close() | |
| 5 | return B2 |
Note: private/remote002.splx is the QVM script in remote storage, which was mentioned in the previous sections.
5. Java integration code: No need to change. Remember to release resources held by the Statement, in case that QVM resources will be used up.
3. Embedded QVS service
The embedded QVS is QVS service embedded in the Java application. It cannot use the global lock and global variables.
1. QJDBC deployment settings:
First, copy QVS jar files located in “esProc installation directory\esProc\q-server\webapps\qvs\WEB-INF\lib” to the Java application class path; then, copy remote storage jar files, which are located in esProc installation directory\esProc\q-extlib\hdfs for HDFS, to Java application class path; last, put QVS configuration file (refer to independent QVS service configuration file) to Java application class path (can be absolute path).
2. Prepare APP script, which will access the embedded QVS service and call QVM script. Suppose the APP script is local_InnerQvs_002.splx:
| A | B | |
|---|---|---|
| 1 | =Qconnect(:“demoqvs”,30,60) | |
| 2 | try | =A1.exec(“private/remote002.splx”,arg1,arg2) |
| 3 | >A1.close() | |
| 4 | return B2 |
Note: Embedded QVS service address is meaningless, so the first parameter in Qconnect() is empty.
3. Java integration code
First, start the embedded QVS service only once using the static method, for which QVS configuration file should be specified through a class path or an absolute path. The operation is generally executed in the initial stage of starting the application or module. Below is the Java code of doing this:
com.scudata.ecloud.server.QVS.init(“/qvsConfig.xml”);
Later we can execute the APP script in the business module. The Java code is the same as calling the database stored procedure:
Connection con = null;
java.sql.PreparedStatement st=null;
try{
    Class.forName("com.esproc.jdbc.QDriver");
    con= DriverManager.getConnection("jdbc:esproc:q:local://");
    st =con.prepareCall("call bucket0925/local_InnerQvs_002(?,?)");
    st.setFloat(1,500);
    st.setFloat(2,600);
    st.execute();
Ⅳ Debug APP script locally
We can develop and debug APP script in the local IDE. Connect to QVS, which requests QVM from QVA, and execute the QVM script in remote storage on QVM. There are two deployment mode for QVS – independent QVS service and QVS service embedded in IDE.
1. Configure and start the independent QVS service
The independent QVS service can be deployed on LAN or proprietary cloud. Just refer to the previous sections.
2. Write QVM script and upload it to remote storage
Refer to the above section for the operation. Suppose we still use remote002.splx:
| A | B | |
|---|---|---|
| 1 | =Qfile(“private/Orders.txt”).import@t() | A data file in remote storage |
| 2 | =Qfile(“private/OrderDetails.txt”).import@t() | |
| 3 | =join(A1,order_id;A2,order_id) | Association |
| 4 | =A3.groups(#1.customer_id; count(1):cnt,sum(#2.item_qty):amt) | Grouping & aggregation |
| 5 | =A4.select(amt>arg1 && amt<=arg2) | Filtering by external parameters |
3. Download APP script used for the independent QVS
The APP script accesses QVS through Qconnect() function and requests QVM from QVA. Download the APP script from remote storage and execute it.
| A | B | |
|---|---|---|
| 2 | =Qconnect(“http://192.168.12.12:8090/qvs”:“demoqvs”,30,60) | Connect to the independent QVS service; the 1st parameter is independent QVS service address |
| 3 | try | =A1.exec(“private/remote002.splx”,arg1,arg2) |
| 4 | >A1.close() | |
| 5 | return B2 |
4. Debug APP script
Perform full-featured debugging on APP script in IDE.
That’s how to use independent QVS service. Now let’s move on to embedded QVS service.
5. Configure and start embedded QVS service
Find QVS service’s configuration file, which is located in “esProc installation directory\esProc\q-server\webapps\qvs\WEB-INF\home\qvsConfig.xml”, and whose content is the same as that of independent QVS configuration file and was already explained in the previous section. Copy this configuration file to “esPorc installation directory\esProc\config”.
The embedded QVS will be started according to the configuration file at the start of IDE.
6. Write APP script for accessing embedded QVS
Write the script for accessing QVS service in IDE:
| A | B | |
|---|---|---|
| 1 | =Qconnect(:“demoqvs”,30,60) | |
| 2 | try | =A1.exec(“private/remote002.splx”,arg1,arg2) |
| 3 | >A1.close() | |
| 4 | return B2 |
Note: Embedded QVS service address is meaningless, so the first parameter in Qconnect() is empty. QVM script is unrelated to QVS deployment mode, and thus there is no need to edit it. We can also perform the full-featured debugging on the APP script for accessing embedded QVS in IDE. The development & debugging method is the same as that for APP script used to access independent QVS.
7. Deploy APP script in the application
Deploy the debugged APP script in the application. The script has two styles – one for independent QVS and the other for embedded QVS. There are two deployment modes for Java application’s QVS service, and two types of syntax for the Java code. Refer to the previous section for details.
Ⅴ Debug QVM script remotely
Another QVS needs to be installed in order to debug QVM script remotely. The QVS is set as debugging mode and only used for remote debugging. It is logically unrelated to the original independent QVS (yet they share many configurations and this functionality is also implemented in QVS service). After the two QVS services are started respectively, the local IDE connects to the debugging mode QVS and reads the remote storage information, which will be maintained by developers in the form of a directory tree. Then we can perform addition, deletion, modification and debugging on QVM scripts (including data files). When we debug a QVM script in IDE, the actual operation occurs on the debugging mode QVS but the edits will be synced to IDE in real-time for the convenience of observation.
1. Configure, run and debug QVS
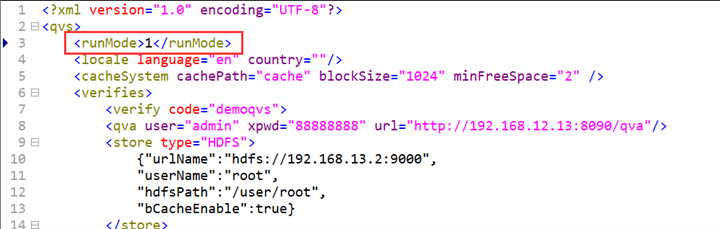
1. Edit QVS settings. The configuration file path is esProc installation directory\esProc\q-server\webapps\qvs\WEB-INF\home\qvsConfig.xml. Three items need to be modified:
1) Change the running mode to runMode=1, which represents debugging mode; 0 is the service mode.
2) Comment out node to not to formally verify QVA account. This step is optional. As the debugging mode does not involve QVA, QVS will skip the step of verifying QVA account.
3) Comment out < store > node to use QVS local file storage instead of the remote storage. But the node can also be retained to use both local file storage and remote storage. The latter enables the maximum compatibility.
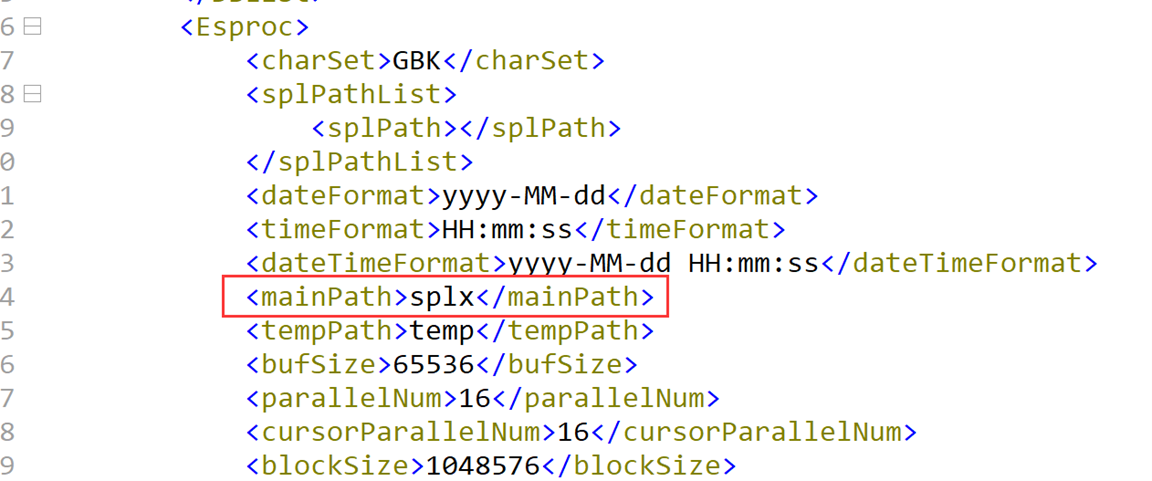
2. Modify SPL settings on QVS. The configuration file is located in esProc installation directory\esProc\q-server\webapps\qvs\WEB-INF\home\raqsoftConfig.xml. The key item is the main directory mainPath, which is QVS’s root directory. The mainPath can be an absolute path or a relative path. When it is a relative path, it is relative to esProc installation directory\esProc\q-server\webapps\qvs\WEB-INF\home.
The service mode QVS and the debugging mode QVS can be deployed on different servers or as two applications in one Web service. For the convenience of maintenance, we can change the URL/application name/directory name of the debugging mode QVS (change it to debug, for instance) while keeping that of the service mode QVS unchanged (being qvs still).
2. Connect to the remote debugging mode QVS in IDE
Start IDE, enter “Remote Services-Login” in the menu bar and enter the connection information of the debugging mode QVS in the window to log in on it.
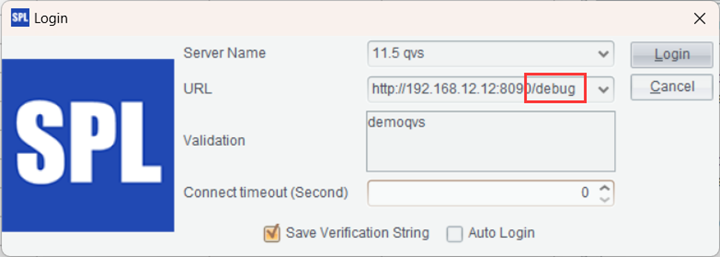
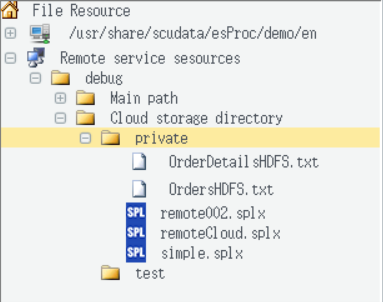
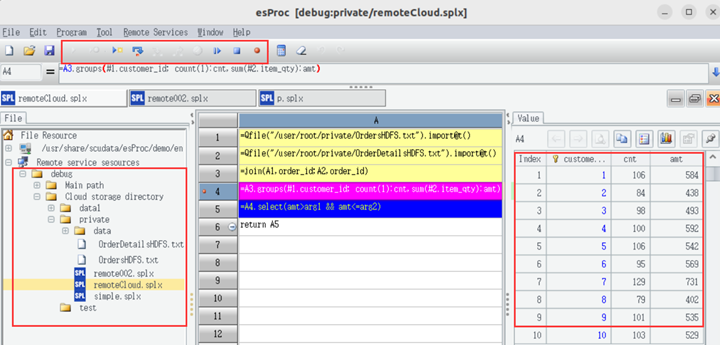
After the QVS is successfully logged in, file resources on it will be displayed on the left part of the IDE. “MainPath” is the file system directory; “Cloud storage directory” stores files on remote storage.
Now IDE is only for displaying the execution result on the remote server. It does not execute the script itself. In essence, the current IDE is logically unrelated to the previous IDE, but they share many things physically. Therefore, we put them in the same application (EXE).
3. Upload debugged script and related files
In the resource list on the left part of the IDE, select a directory under “Cloud storage directory”. Right-click “private”, for example, and select “upload file” in the pop-up menu to enter the “Upload File” interface.
For the convenience of users, they can type in the subdirectory name manually after an existing upload path, such as changing “private” to “private/data”, to achieve the effect of creating a subdirectory “/data”.
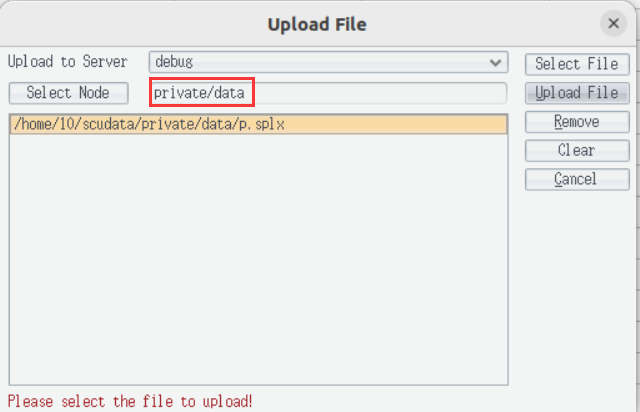
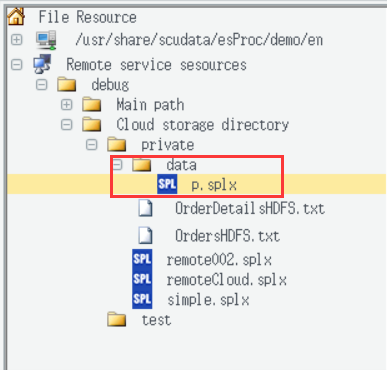
Click “Upload File” button to upload files, and close the “Upload File” interface when the uploading is finished. The newly-created directory will be automatically listed on IDE. Click the directory and we can view the uploaded file:
Use the same way to upload data files. Here we just skip the details.
4. Execute /debug scripts remotely
Double-click an uploaded script to open the remote storage script, then we can modify, delete, save, run or debug the script remotely. The actual operations happen on QVS but they will be synced to the local IDE.
6. Debug APP script remotely
We can debug the APP script remotely. To do this we also need to start two modes QVS – one is the service mode and the other is the debugging mode. Log in on the debugging mode QVS from the local IDE and read the remote storage information on it to maintain APP scripts and data. The code in the APP script connects the QVS through Qconnect() function, requests QVM and executes QVM script. When debugging APP script in IDE, the actual operations happen on QVS but they will be synced to IDE in real-time for intuitive observation.
1. Configure and start the service mode QVS
The service mode QVS is the general, independent QVS. It is usually deployed on LAN or proprietary cloud. The key is to make runMode=0 in configuration file qvsConfig.xml (Refer to the previous sections for details).
2. Configure and start the debugging mode QVS
The debugging mode QVS was also explained above. The key is to make runMode=1 in configuration file qvsConfig.xml (Refer to the previous sections for details).
3. Connect to QVS from IDE remotely
Start IDE, enter “Remote Services-Login” in the menu bar and enter the connection information of the debugging mode QVS in the window to log in on it (Refer to the previous sections).
4. Upload files and scripts
Refer to the previous sections for the process of uploading files and scripts. Note that here it is the APP script that we will upload. The Qconnect() function in APP script connects to the independent QVS service.
| A | B | |
|---|---|---|
| 2 | =Qconnect(“http://192.168.12.12:8090/qvs”:“demoqvs”,30,60) | Connect to independent QVS service; the 1st parameter is the independent QVS service address |
| 3 | try | =A1.exec(“private/remote002.splx”,arg1,arg2) |
| 4 | >A1.close() | |
| 5 | return B2 |
5. Execute/debug scripts remotely
Double-click an uploaded script to open the remote storage script, then we can modify, delete, save, execute or debug the script remotely.
SPL Official Website 👉 https://www.scudata.com
SPL Feedback and Help 👉 https://www.reddit.com/r/esProcSPL
SPL Learning Material 👉 https://c.scudata.com
SPL Source Code and Package 👉 https://github.com/SPLWare/esProc
Discord 👉 https://discord.gg/2bkGwqTj
Youtube 👉 https://www.youtube.com/@esProc_SPL


Chinese version