

Embedded QVS Guide
This document is intended for users who have mastered Scudata SPL Cloud (SSC) deployment but still want to learn more about the uses of QVS.
Besides deploying the QVS server, there is another way to use the QVS service – embedding QVS in an application. The embedded QVS is more convenient to implement. It just requires configuring ecloud-********.jar and qvsConfig.xml files.
In embedded mode, Qconnect(url:v,wt,it) function is used to connect to the QVS server. Here parameter url should be omitted.
Now we illustrate how to use the embedded QVS through an example – to connect to QVA on GCE via the embedded QVS and then request QVM to execute the script file employee-cursor.splx in bucket unbucket100 on the remote storage service GCS. By default, both QVA and QVM are in the startup state.
Using embedded QVS in an application
Deploy ecloud-********.jar to the target application and invoke com.scudata.ecloud.server.QVS.init(configFilePath) when the application is started. Parameter configFilePath is path of the QVS configuration file qvsConfig.xml. The path can be an absolute one or a relative one. For a relative path, it is relative to the application project’s class path. We’ll take QJDBC as an example to illustrate how to implement the embedded mode:
1. Deploying QJDBC
First, integrate QJDBC into your project application (See detailed process
Scudata SPL Cloud Deployment)
).
2. Loading ecloud-********.jar
The startup of the project application will load ecloud-********.jar used by QVS. The jar file is located in【esProc root directory】/esProc/lib. With a web application, we can put the jar file in WEB-INF/lib.
3.Configuring esProc serial number
Configure esProc serial number in raqsoftConfig.xml.
[installation directory] /esProc/q-server/webapps/qvs/WEB-INF/home/raqsoftConfig.xml:
<?xml version="1.0" encoding="UTF-8"?>
<Config Version="3">
    <Runtime>
        … …
        <Esproc>
            … …
			<serialNo>O1XEHMFHBZG4S</serialNo>
        </Esproc>
        … …
    </Runtime>
</Config>
4.Configuring qvsConfig.xml
qvsConfig.xml is located in [installation directory] /esProc/q-server/webapps/qvs/WEB-INF/home. Configure it according to your actual environment and put it in any path. Here we put it in【application root directory】/config.
<?xml version="1.0" encoding="UTF-8"?>
<qvs>
	<runMode>0</runMode>
	<locale language="zh" country=""/>
	<cacheSystem cachePath="cache" blockSize="1024" minFreeSpace="2" />
	<verifies>
		<verify code="GCP-35.236.6.87">
			<QVA user="admin" xpwd="88888888" url="http://35.236.6.87:8090/QVA"/>
			<store type="GCS">
				{"credentials":"scudata-891de5fb1bc9.json"}
			</store>
		</verify>
	</verifies>
</qvs>
The scudata-891de5fb1bc9.json file used above for connecting GCS remote storage is put in the application project’s class path.
Learn more about configuring qvsConfig.xml Scudata SPL Cloud Deployment.
4. Designing and deploying script file
Create the following splx file and save it as Qcon.splx:
| A | B | |
| 1 | =Qconnect(:"GCP-35.236.6.87",30,300) | Request QVA on GCE to assign QVM via the embedded QVS; parameter url should be absent when embedded QVS is embedded. |
| 2 | =A1.exec@x("unbucket100/employee-cursor.splx";100) | Execute the script file on GCS via QVS; use @x option to close QVM automatically after the result is returned. |
5. Invoking script file in Java
import java.sql.Connection;
import java.sql.Driver;
import java.sql.DriverManager;
import java.sql.PreparedStatement;
import java.sql.ResultSet;
import java.sql.ResultSetMetaData;
import com.scudata.ecloud.server.QVS;

public class qconnect {
		  Connection con = null;
		  java.sql.PreparedStatement st;
	public void testDataServer(){
			  try{
			  // Establish QJDBC connection
			  Class.forName("com.esproc.jdbc.QDriver");
			  Driver d = DriverManager.getDriver("jdbc:esproc:q:local://");
			  con = d.connect("jdbc:esproc:q:local://", null);
			  // Invoke script file Qcon.splx
			  st=con.prepareCall("call Qcon()");
			  st.execute();
			  // Get the result set
			  ResultSet set = st.getResultSet();
			  ResultSetMetaData meta = set.getMetaData();
			  while (set.next()) {
				  for(int i=0; i<meta.getColumnCount(); i++){
						System.out.print(set.getObject(i+1) + "\t");
					}
					System.out.println();
				}
			  }
			  catch(Exception e){
			  System.out.println(e);
			  }
			  finally{
			  // Close the connection
			  if (con!=null) {
			  try {
			  con.close();
			  }
			  catch(Exception e) {
			  System.out.println(e);
			  }
			  }
			  }
		}
	public static void main(String[] args) throws Exception {
		// Invoke com.scudata.ecloud.server.QVS.init(configFilePath) and pass qvsConfig.xml’s relative path as a parameter
		QVS.init("config/qvsConfig.xml");
		qconnect tds = new  qconnect();
		tds.testDataServer();
	}
}
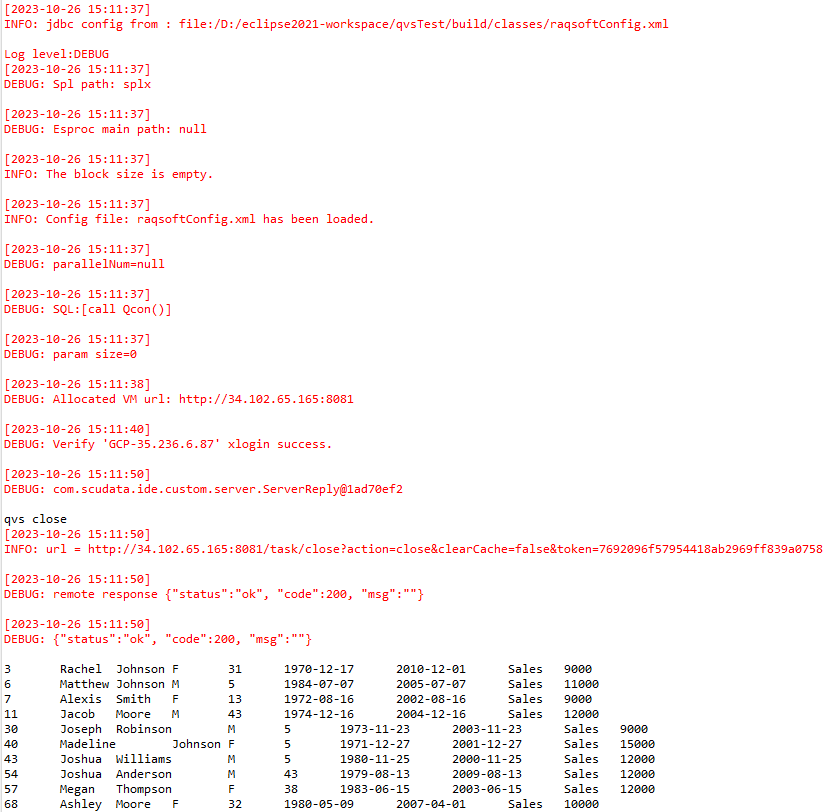
Result of executing the above script file:
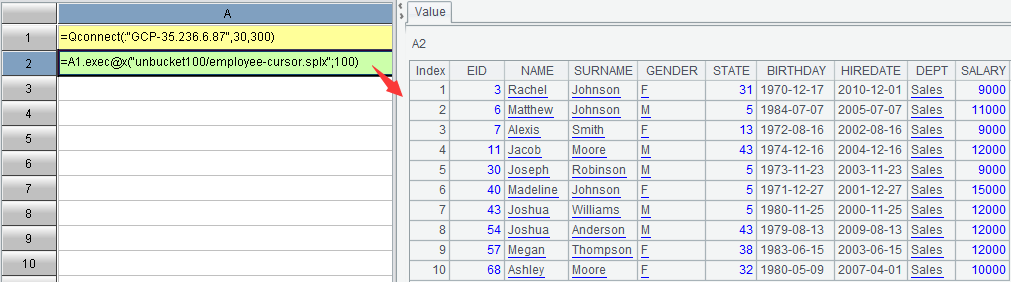
The QVS can also be embedded in the esProc IDE. There is the built-in ecloud-xxxxxxxx.jar in esProc installation package; and put scudata-891de5fb1bc9.json used for connecting GCS remote storage in the class path (such as [esProc installation root directory]/esProc/lib). Start esProc IDE, specify qvsConfig.xml in 【Tools -> Options -> Embedded QVS】, and restart IDE to launch the embedded QVS. Now we can execute script file Qcon.splx:

Though the embedded QVS is more convenient to implement, it has certain limits. It does not support the debug mode, does not allow omitting deploying QVA, and cannot use the global lock and global variable. You can choose the more suitable way of using QVS as needed. Learn more about QVS deployment Scudata SPL Cloud Deployment.
SPL Official Website 👉 https://www.scudata.com
SPL Feedback and Help 👉 https://www.reddit.com/r/esProcSPL
SPL Learning Material 👉 https://c.scudata.com
SPL Source Code and Package 👉 https://github.com/SPLWare/esProc
Discord 👉 https://discord.gg/2bkGwqTj
Youtube 👉 https://www.youtube.com/@esProc_SPL


Chinese version